Showing posts with label halloween. Show all posts

Friday, May 13, 2011

Ladybug Makeup Tutorial


I am so sorry guys for not posting in ages! I really have been so busy (as usual) with the store and I was just on vacation for two weeks. I have actually contemplated giving up this blog, however I got some sad responses and people who were very upset about it. So here I am :) Eresmuybella is here to stay! :D

So I was at a loss at what tutorial to do for you guys. I wanted to do something kinda different and unique. My intention was to do something that you could wear everyday however it turned into a Halloween type tutorial.

This has got to be the easiest tutorial I have ever done. :p It might be helpful if you looked at a picture of a ladybug to create this look.


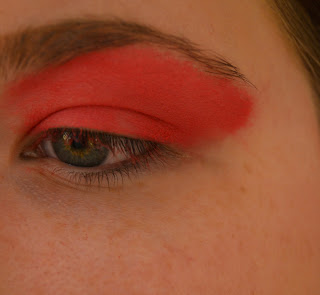
First start with a red eyeshadow and apply it all over your eye continuing up to the eyebrow. Working with red is a difficult task because it actually will stain your skin with a pinkish tint. But don't worry that can be removed with some makeup remover :) So my tip is to have either eye makeup remover handy or the makeup remover wipes. Q-tips work the best with eye makeup remover however for this look I used the wipes.


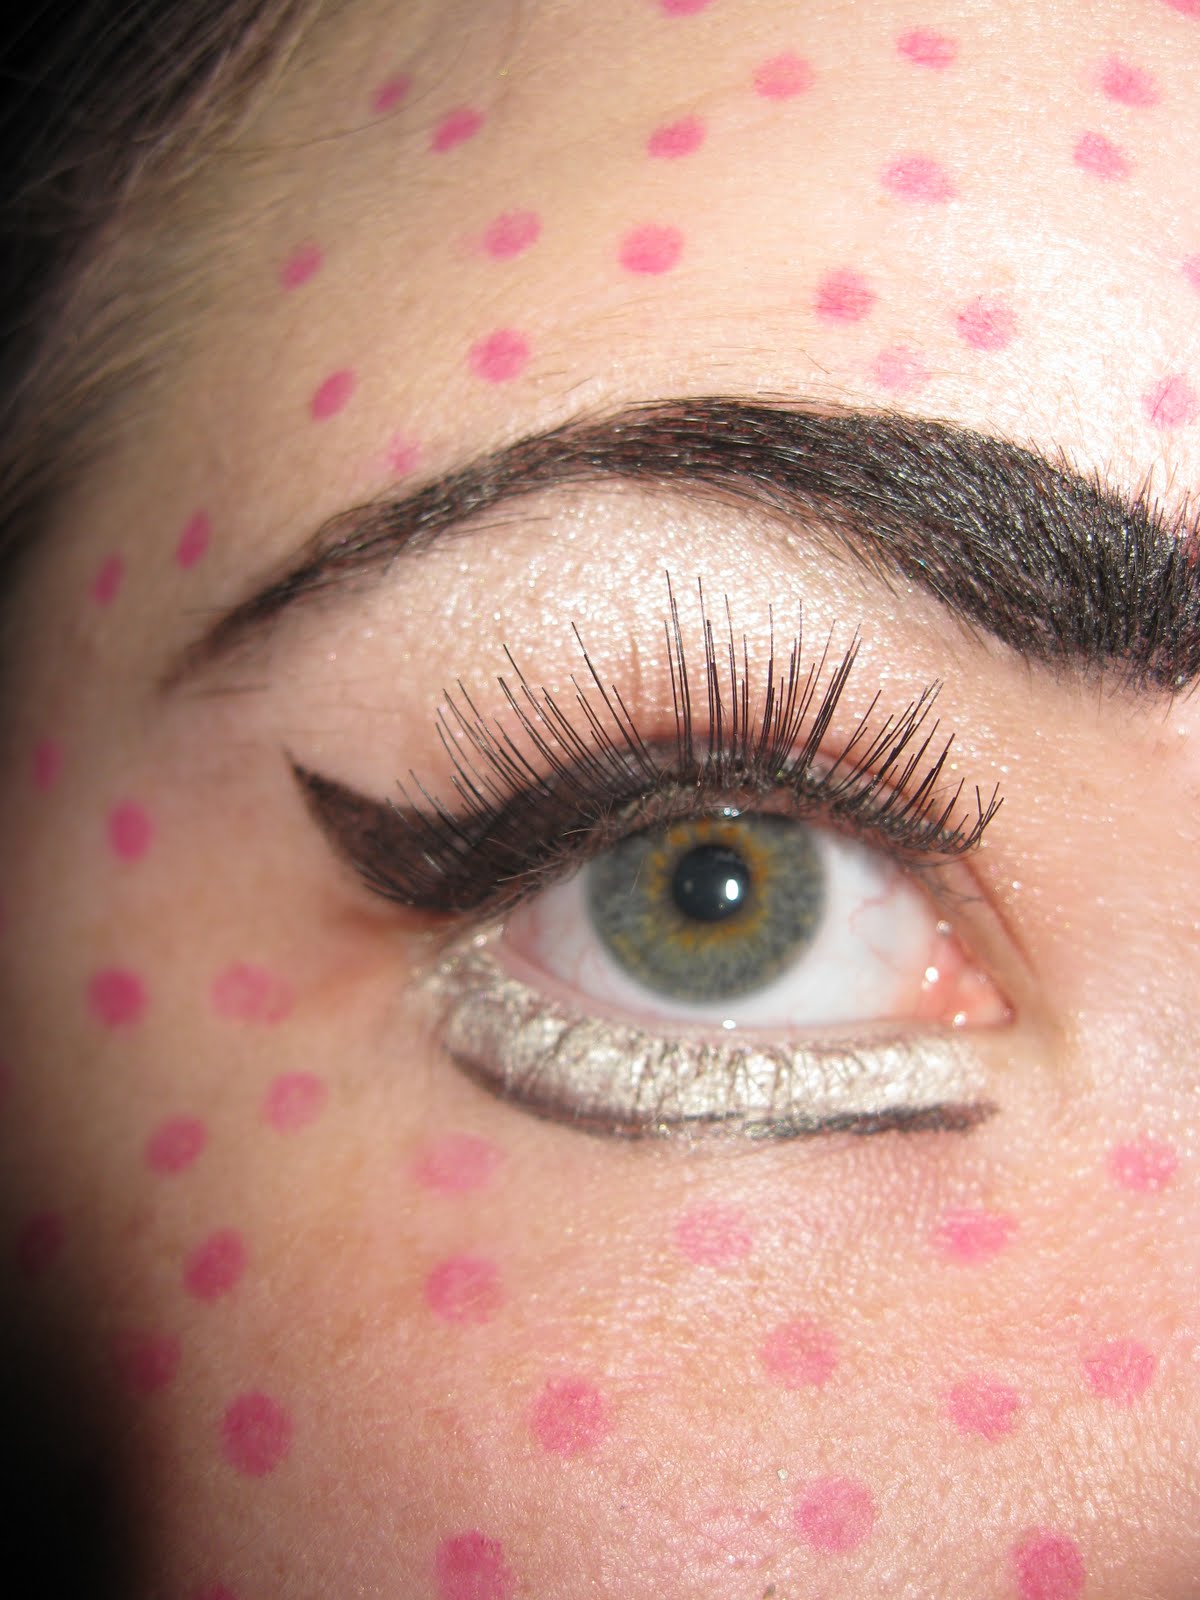
Next take a black liquid eyeliner and draw a circle at the outer corner of your eyes and fill the circle in. I am using two different eyeliners, a felt tip and just a regular liquid eyeliner. Next draw the legs don't draw them right underneath your lashes start about a half an inch away from your eye. That is where you will fill in the red eyeshadow. I drew just two legs, you could draw more but I didn't want it to make the makeup look messy.


Next draw the spots, you can draw them sporadically or in some kind of pattern. Now draw the antennas right above the circle you created.


Then take the red eyeshadow on a thin brush and fill the color right underneath your waterline. Make sure the corners of your eyes are filled with the red color.


Then take the black liquid eyeliner and line your eye to give it a little bit of definition.


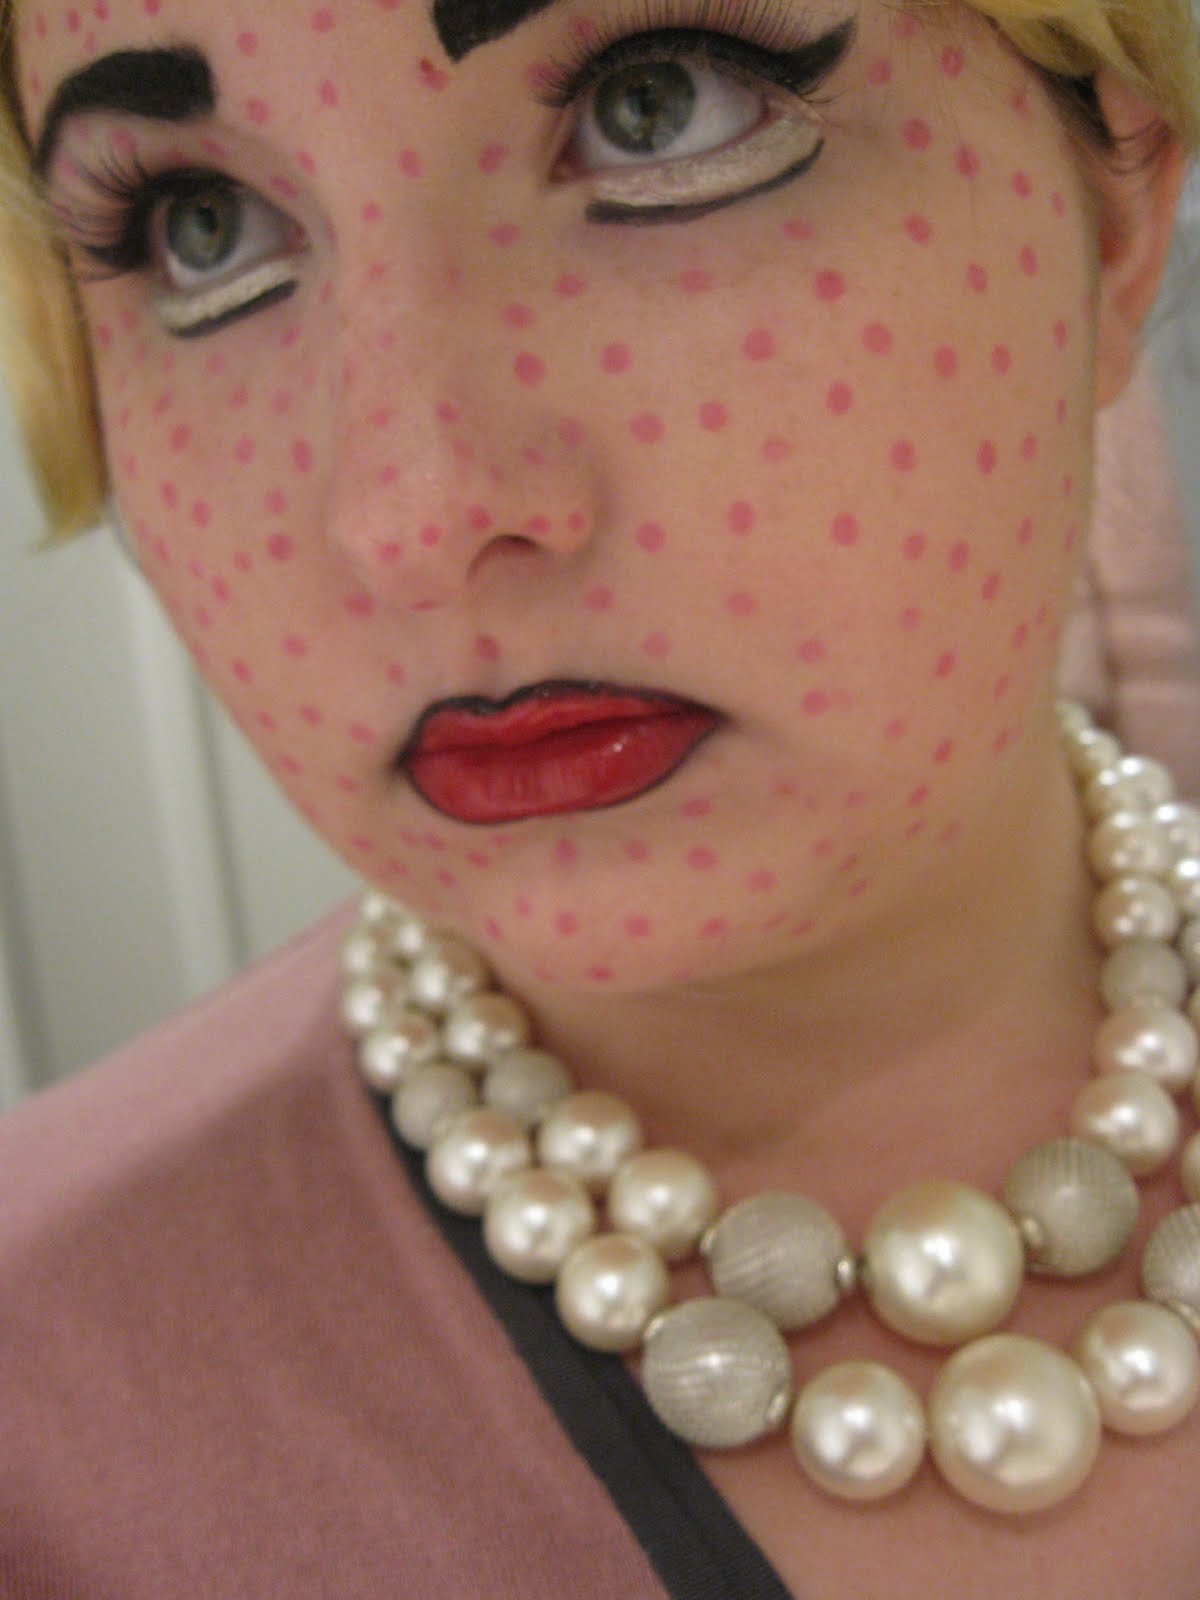
Next fix any mistakes and touch ups. I didn't put any mascara on for this look because I thought it would be too much.


And there you go! You are finished! See how easy that was? ;)

Go try it and impress your friends. This makeup look can also substitute as a fast and creative Halloween costume :)


If you have any questions, comments, concerns or complaints. Email me! I would love to hear from you!

Continue reading...

Saturday, January 29, 2011

Gem from Tron


I love this look so much. It is so much fun and perfect for a night at the club or a costume party. I love how dramatic and awesome the eyes are played up. As soon as I saw the movie I fell in love! My boyfriend was telling me how good the first one was and was like gushing over it. He got me hooked. :p When I saw Gem's makeup I just had to recreate it, it is just so much fun!


First as usual ladies; moisturizer, and primer. Gem is actually white in the movie but if you actually made yourself white it would look weird since you don't have camera effects on you :p However you do want to go a shade lighter of foundation or even two shades if you can. I used Loreal's True Match foundation in Porcelain. Then used Bare Essentials Mineral Veil powder and applied it all over my face. I did two applications of the powder. This powder is almost impossible to make look cake-y. It just gives your skin a nice finish. Gem doesn't have any flaws or blemishes on her face, nor black circles. So conceal your dark circles, the redness (if you have it) on the sides of your nose, on the sides of your lips, any blemish or imperfection you want to hide.

Next comes the fun part, the eyes. I don't have very many tips for you to get the perfect shape, but I can recommend that you have eye makeup remover handy with a couple of q-tips. That way if you make any mistakes you can instantly fix them. Apply a eyelid primer to your eyes to prep them and so that the eye makeup will last longer. I used MAC's Painterly Paint. First thing you want to do is create the shape of the eyeliner. Using a gel based eyeliner in this case I am using Stila's Smudge Pot in black cat. Use your eyeliner brush and draw an outline of the shape you want. Draw the line just a little past your crease. Look at a picture of Gem to help guide you. Then fill the outline you just created. Bring the line down underneath your water line, connecting the lines in the corners of your eyes. Repeat these steps on the next eye. Touch up any mistakes you made on the way if needed.

Now time for lashes, you will need two pairs of lashes. It is really up to you what kind of lashes you want to use, any will do. I used two different MAC lashes this one and this one. Measure the lashes to your eye and cut according to your eye shape. Lashes almost always have to be cut because nobodies eyes are that long. :p Apply a thin strip of glue along the lashes and place as close to the lash line as possible. Repeat again with the next pair of lashes. Your look should be coming together.


You don't want to use strip lashes for the bottom lashes since this will look weird and won't be the look you want. Individual lashes are a pain to put on, but trust me you will thank me after you are finished ;) I used about 6 or 7 individual lashes on each eye. You may want to apply more depending on how long and thick your bottom lashes are. Take tweezers to pick up the lashes and dip the tip in glue you only want a tiny amount of glue. Then apply on the lashes, but be careful not to glue them to your waterline. This is pretty time consuming so just be patient.


Now if you don't have naturally black eyelashes take some liquid eyeliner and apply a tiny bit on your own lashes to blend in the with the fake ones. It helps give a cleaner look.

We won't be applying any blush because Gem's face is all one color. But for eyebrows you can go for the real look and arch your eyebrows really high and hiding your own with concealer. But I just worked with the shape of my own eyebrows and filled them in with black eyeliner. You be the judge and decide what you want to do.


Gem has a really tiny nose so to make my nose look smaller I took a light brown eyeshadow and lightly brushed it on the sides of my nose.


Last step apply a pink glossy lipstick/gloss. Gem's lips are glossy in the movie but not dramatic because her eyes is what is meant to catch your eyes.


And finished! :) This look is really quite simple and only requires your time and effort :p I hope you enjoyed this as much as I did.


If you have any questions, comments, complaints or suggestions. Email me at

Continue reading...

Sunday, October 24, 2010

Comic Book Girl tutorial


I am extremely proud of this look, and for the longest time I couldn't come up with "unique" Halloween tutorials, because basically any tutorial you want you can find online, so I tried to do ones that weren't already done, or done in a good fashion :p This is perfect for those Halloween parties you want to impress people or even trying to win a cash prize ;)


First you want to start off with a fresh clean face, moisturize and apply primer. Your foundation should be at least three shades lighter for this look, but really you can just use your regular foundation. I used Roy Lichtenstein's artwork as reference. The whole process will take you sometime so be patient.

Next sculpting the eyebrows, take a liquid eyeliner and fill them completely in. Make them dramatic, have the beginning of the eyebrows squared off and the ends come to a point. Really give them shape and definition.

Now for your eyes, it is really up to you how you want to make your eye look, I played with a couple different eyeliner looks and my favorite was the chunky wing. Take a liquid eyeliner I am using Telescopic liquid eyeliner by L'Oreal and play around with it, have makeup remover hand though ;) it really helps, trust me :p I also applied a little eyeshadow, just a light pink above the eyeliner (if you do this you will have to outline the black again) Take a shimmery white and apply it right under your brows. Take your liquid eyeliner and create a line an inch below your waterline, this makes your eyes appear doll-like and really makes them look larger. Apply false eyelashes, just get any big dramatic ones you'd like, any will do really. I am using Lash 4 by MAC. Take a white eyeliner and fill in the gap between your water line and the line you just created. Make sure you also fill in your water line as well. More is better in this case, this is creating that doll like eye. Making it appear larger and more open.


Next outline your lips, mistakes are okay just try to keep your hand as straight as possible. After you have your lips outlined take a red lipstick, not stain, not lipgloss, actual lipstick, and apply all over your lips make sure you get the corners as well! After you filled in the lips then you can fix and mistakes, use makeup remover to erase and then redraw. It may take you a few times, it did me anyways.


Last but not least is the red dots. Take a red lip liner and point on your face and twist it the tiniest bit to get the round shape. They should be in line with each other, which mine are not because I did this blind :p I don't know what happened to my contacts so I just did it blind :p but keep them in line if you can, and hey if they aren't who cares? Make sure you do your neck and right underneath your eyebrows. The best part about this look is that if you have pimples you can hide them with the lip liner!

Lastly is a wig a blonde wig is a better choice, you can also add lines for more definition like Lichtenstein does in his cartoons ;) Prepare to get complements! ;)


Hope you have enjoyed this tutorial I sure enjoyed making it for you guys :) If you have any questions, comments, advice, etc. Let me know! :D Email me!


Continue reading...

Saturday, October 23, 2010

Princess Peach Tutorial


I love the old Nintendo Mario games, Super Mario Bros 3 was my favorite :) So I thought of doing an easy and quick tutorial for those last minute Halloween parties.


First apply an eyelid primer to make the colors pop, especially with pink because sometimes the color is not bright enough to see. Apply a bright pink eyeshadow all over your eyelid. I used my Coastal Scents 88 palette. Any pink will be fine. Next apply a dark purple color to the crease for definition and for a pretty color palette. Buff the color up towards your brow bone. Next take a pearl shimmery white color and apply it right on your brow bone. Blend the color down to the purple to fade the purple out. The purple should be dark in the crease and light toward the brow bone.

For eyeliner I used a felt tip eyeliner pen, but you are welcome to use liquid eyeliner. I prefer to use the felt tip for this specific look because you can manipulate the brush to your liking. Create a line beginning from the inner corner of your eye to the outer corner, wing it out. For best results start the line in the middle of your eye and work your way out. Make the line thicker toward your outer corner and wing it out. If you make any mistakes use a q-tip with a little bit of makeup remover.

Next take a white eyeliner and line your waterline. Really pack that eyeliner on, you want to brighten up your eyes and also give them a doll like appearance.

For eyebrows, lightly fill them in, I used a light brown to just color them in. You want to keep them light especially if you are going to be wearing a blonde wig.

Next apply the individual false lashes, apply them to the outer corner of your eyes. Two or three should be sufficient enough. Heat your lash curler, then curl your lashes with the fake lashes and apply mascara. Heating your eyelash curler acts as a curling iron for them. Make sure its not too hot to put on your eyelid though. Just warm enough to curl them. I didn't apply the fake lashes because I like the way my lashes looked. Curl your lashes again to give them an extra boost.

The finished eye should look like this:


Cheeks are next, no not those ones :p Use a really pinky color. I used my Smashbox O-Glow blush. Which comes out of the tube clear but when applied on skin turns pink. Apply it to the apple and your cheek bones. Blend really well so the color is not as strong. You want to have a pink glow, not a i-obviously-put-blush-on look.


For the lips, well Peach has really tiny lips. But I lined my lips with a pink color and put a peach lip gloss on. You can exaggerate her lips if you would like, it is really up to you :)

If you have brown hair like I do, get a blonde wig. I made a paper crown out of construction paper and glued little craft gems to it for just a simple Princess look. Her crown is really tiny so one piece of construction paper should be fine. And to secure the crown so it doesn't fall off your head you can use blonde bobby pins. :)


VIOLA! DONE! :D You have now been transformed into Princess Peach :) If you have any questions, comment, concerns, complaints ect. Email me! :)


Continue reading...

Saturday, October 2, 2010

Belle - Halloween Tutorial


This is the first of my Halloween tutorials, I wanted to start with something easy then work up to the best ones. Don't worry I will have you wowed ;) The anticipation is killing you isn't it?

I choose Belle because she is very soft and come on, who doesn't want to look like her really? I thought it would even be a good look for a first date! This look will look good on anyone, the colors are neutral and romantic. For inspiration I even watched the movie Beauty and the Beast :)

I will also show you how to do your hair like her at the end of this tutorial, I didn't use a wig since I already had long brown hair of course :p

First are the same steps as always moisturizer, and face primer. They will forever be the first steps to any makeup you apply. Next is foundation, Belle has a really flawless skin, so you want to make sure your skin looks flawless as well. For this I suggest using a liquid foundation, it is the easiest to blend. I applied two coats of Loreal's True Match, Super Blendable Makeup in ivory. I spot treated my cheeks a third time to rid my cheeks of their rosy color. Now take your powder I am using Smashbox's Halo powder, and take a big fluffy brush and lightly dust all over your face. By doing so you are sealing the foundation, giving it a more finished look, and giving an airbrush type of effect. Next concealer, apply this under your eyes, sides of your mouth, sides of your nose, where any redness occurs and any blemish or imperfection you want to hide. Now define your eyebrows, Belle's eyebrows are thin and roundish shaped; however do not worry about following her exact look, because what looks good on a cartoon doesn't necessarily mean it will look good on you too :p So follow the natural shape of your eyebrows, filling in any areas where the hairs are sparse.

The next step is eyeshadow, now you can basically do whatever you want for this part but I decided to do very light subtle pinks to keep this looking natural and soft. I first applied some eye primer, when I doing natural and not so bright colors I like to apply Smashbox's eyelid primer more than using my MAC one. So for this case I used Smashbox's eyelid primer. I applied a shimmery pink eyeshadow to my lid, then a lighter pink to my crease and up to my brow bone, then applied a light shimmery white to my brow bone. I also applied the white to the inner corners of my eyes to brighten them up a bit. Then I wet my brush with water and dipped it in the pink shimmery eyeshadow again and applied it to the center of my lid to make the color more visible. The colors are a little hard to see with the camera but you get the idea.

The middle color is the color I used for my lid, the pink was for the crease and white for brow bone and inner corners.

Now time for eyeliner, I used my Stila Black Cat eyeliner I was going to use liquid eyeliner, but I was afraid that the look would loose its soft and romantic feel so I opted out and used the Stila one instead. Start from the middle and work your way out to the outer corners. Wing the eyeliner out for a cat eye look. If you notice Belle has three distinct eyelashes, and winging the eyeliner out is creating the first one. Then go back to the middle where you started the line and trace along all the way to the inner corner. Belle's eyes are very defined with black, so you want to do the same.

Next step is fake eyelashes, you can buy these at any drug store. For this look we will use individual eyelashes, which can be tricky. Take your glue and apply a little tine tiny dot on your finger, not directly on the lash. You have to work fast because the glue dries fast. Take the lashes you want to apply, I chose the longest ones, and stick the end of the lash in the glue let the glue get tacky for 20 seconds and apply to the corner of your lash line. Repeat this step again with another lash and apply right next to it. Then curl your lashes, but be careful because the lash curler could bend your lashes. I tried to only curl my real lashes, however it may be a better idea to curl your lashes before applying the lashes :p If you want, instead of individual lashes, you can buy any regular size drug store lashes, cut them in half and apply them to the outer half of your lashes. Apply your favorite mascara.


The next step is highlighting, as you can see in my picture above my cheeks are very illuminated. To do this I first applied a soft pink blush, Bare Minerals Laughter, to my cheek bones and apples of my cheeks. Then I applied Benefit's High Beam and a lot of it. I applied this all over the apples of my cheeks, until I got that super glow. I also applied it above my eye brows and right above my lips and below my lower lip.

The second to last step you want to make your nose look smaller, more cartoon like. Belle's nose is really small, so we want to get that look. This is done with a light brown color. Just take your brush and follow the lines of your nose looking straight into the mirror. To soften the harsh edges take a fluffy brush and light brush over them. This sounds weird I know but it really does make a difference ;)


The very last step is lips. Belle has light pink lips which are very defined. I took a lip brush and outlined my lips with my concealer. To define them and give them a perfect shape. You can basically create any shape you want. Take a light pink lipstick color on a lip brush to fill them in. I am using an Estee Lauder light pink lipstick.


FINISHED! :D Now time for hair, wash your hair and if you have flat and lifeless hair, apply a rootlifter in your hair before it dries, or before you dry it. I just let my hair air dry since it dries curly. Belle's hair has her hair parted and pulled back on either side to the back of her head. I pulled my back at my side part with bobby pins, pushing them forward on my face a bit. Then I took my hair and pulled half of it up in a pony tail and made it into a bun, leaving some hair down. I then took an extention pony tail hair piece and clipped it right under the bun pushing it forward. Belle's hair is very neat and in place, however my hair was a bit on the messy side and I liked the look of it, you can create a cleaner look with hair spray and curling irons or just buy a wig :p Pony tail extensions are really cheap, around $20 that is for synthetic hair, the real hair ones are a lot more pricey. As long as you take care of the synthetic ones you will be just fine with them :) DO NOT WASH THEM. That ruins them and makes them frizz. Get a wig brush and only brush the hair with that brush. Others will pull the hairs out.


The first picture is the clip in, and the second is my real hair with the bun.

If you have any comments, questions or suggestions please feel free to email me :) Oh and please send in any ideas you have for makeup tutorials for Halloween. I will try to do all of them plus my own ideas ;) Stay tuned! Email at:


Continue reading...
 

Eres Muy Bella Copyright © 2009 Cosmetic Girl Designed by Ipietoon | In Collaboration with FIFA
Girl Illustration Copyrighted to Dapino Colada