Friday, May 13, 2011

Ladybug Makeup Tutorial


I am so sorry guys for not posting in ages! I really have been so busy (as usual) with the store and I was just on vacation for two weeks. I have actually contemplated giving up this blog, however I got some sad responses and people who were very upset about it. So here I am :) Eresmuybella is here to stay! :D

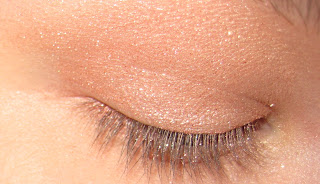
So I was at a loss at what tutorial to do for you guys. I wanted to do something kinda different and unique. My intention was to do something that you could wear everyday however it turned into a Halloween type tutorial.

This has got to be the easiest tutorial I have ever done. :p It might be helpful if you looked at a picture of a ladybug to create this look.


First start with a red eyeshadow and apply it all over your eye continuing up to the eyebrow. Working with red is a difficult task because it actually will stain your skin with a pinkish tint. But don't worry that can be removed with some makeup remover :) So my tip is to have either eye makeup remover handy or the makeup remover wipes. Q-tips work the best with eye makeup remover however for this look I used the wipes.


Next take a black liquid eyeliner and draw a circle at the outer corner of your eyes and fill the circle in. I am using two different eyeliners, a felt tip and just a regular liquid eyeliner. Next draw the legs don't draw them right underneath your lashes start about a half an inch away from your eye. That is where you will fill in the red eyeshadow. I drew just two legs, you could draw more but I didn't want it to make the makeup look messy.


Next draw the spots, you can draw them sporadically or in some kind of pattern. Now draw the antennas right above the circle you created.


Then take the red eyeshadow on a thin brush and fill the color right underneath your waterline. Make sure the corners of your eyes are filled with the red color.


Then take the black liquid eyeliner and line your eye to give it a little bit of definition.


Next fix any mistakes and touch ups. I didn't put any mascara on for this look because I thought it would be too much.


And there you go! You are finished! See how easy that was? ;)

Go try it and impress your friends. This makeup look can also substitute as a fast and creative Halloween costume :)


If you have any questions, comments, concerns or complaints. Email me! I would love to hear from you!

Continue reading...

Sunday, March 6, 2011

Eyebrows


Eyebrows are the most important element on your face. You don't think much of them, but they really can change your look drastically. They have the power to make you look younger or older, scary or cute. :p So it is really important to take care of them and groom them. Just to prove my point I will show you some pictures of celebrities without eyebrows.

Some of the prettiest women look really awkward without eyebrows. So as you can see eyebrows play an important role in the look of your face. First things first if you wear glasses like me, stay away from round eyebrows. When wearing glasses your eyebrows should complement. Since glasses draw attention directly to your eyebrows. Also you have to watch the thickness of your eyebrows. The thinner the older you look, and the thicker the older you look. I let my eyebrows grow a little for this tutorial :p

Every woman has a different shape to her eyebrow. Not every woman can wear an arch, so to determine the shape of your eyebrow my best advice is to get them done professionally. Go to a salon and get them done. Personally I prefer threading opposed to waxing. It hurts less and is faster. Threading isn't that much it usually is about $8 - 11 depending on where you go. They are really good at determining your brow shape. The way they achieve this is by having you pull your eyebrow up creating an arch like this:
To keep them up is not that hard just a couple steps that you could even do before bed! All you need is
Let me tell you that there are a lot of different tweezers out there and the Tweezerman brand is the best it is the sharpest and grabs the hair.

First take your eyebrow brush and brush the hair up
Then take your scissors and cut the long hairs.
Then take your tweezers and clean up the middle, right above your nose and any place you may have little hairs that are in an unwanted place :p


Then for the last step take a eyebrow pencil and color your eyebrows in. Remember the beginning of your eyebrow should be lighter then the back. Color in any sparse areas, this is good if you accidentally plucked too many hairs. :p I am using my favorite MAC eyebrow pencil.

And finished! :) See that wasn't so hard!

If you have any questions, suggestions, comments, or complaints. Email me!


Continue reading...

Monday, February 7, 2011

Valentine's Day look


Valentine's Day is right around the corner, a week from today actually :p I wanted to do something with a sexy and sultry. Mission accomplished I think ;)


First as always ladies the same old same old. Moisturizer, foundation, concealer, powder and eyeshadow primer. Keep your eye brows light but make sure they have a shape. I am using MAC's eyebrow pencil in taupe. I love this pencil it looks so natural and fills my brows help giving them a gorgeous shape! :D If you haven't tried it, YOU MUST.

Now that we got past the boring part :p I mixed a red and a pink eyeshadow from my Coastal Scents palette. I put more red then pink however. I wanted it to be dramatic, but I thought red would be too dramatic for a daytime/date look. So I took a pink and toned it down a bit. Apply the eyeshadow all over your lid just up to your crease if you go beyond your crease don't worry just blend it out. What I found out is using my fingers for the Coastal Scents Palette works better because using a brush takes longer to get the dark color. It always goes on light with a brush and you have to work up the color. Apply the eyeshadow underneath your eye as well as close to your waterline as possible. Connect the color from the inner corner of your eye to the outer corner.

Next step apply a lighter pink then before right above your crease. Just to help fade the color out a bit and plus I really like these colors together :p Then take a pearly white color and apply right on your brow bone. Blend the white and the pink together.

Next take a felt tip eyeliner and draw your line. Start in the middle and wing out the ends. The best advice I have for this is have eye makeup remover right at hand to tweak the line if it isn't what you want. Practice makes perfect ;) I start with the felt tip because it easier to whip away then liquid eyeliner. It is a lot easier to work with as well. We will go over the line with a liquid eyeliner in a bit but first apply your eyelashes.


First apply mascara to your own top and bottom eyelashes to help with the look of thick and full eyelashes. Then apply your lashes, I am using MAC's eyelashes. Take your glue and apply a thin strip across the lashes then wait 30 seconds to dry. I am using MAC's glue which is really amazing and sticky so your eyelashes stay in place! Press the eyelashes to the middle of your eye and lightly tap the eyelashes across your eye. After you get the lashes on keep your eyes slightly closed for a few minutes. So that the eyelashes stay in place.


After you have your eyelashes in place, take a liquid eyeliner and trace over the line. Make sure you go right over the eyelashes so your line looks more defined. Next take a white eyeliner and line your waterline. This helps brighten up your eyes a bit.


 This is how the how the finished eye should look:
For your cheeks take a light pink and apply it right on the apple of your cheeks. Then take Benefit's High Beam and apply that right above the apples of your cheeks and on your cupids bpow (right above your lip)

For the finishing touch your lips, if you are going on a date for Valentine's Day you have to have super kissable lips. So first take your lip balm my favorite is EOS and apply it on your lips. Then take your lip stick in this case use a super light pink color. Then take a tissue and dab your lips with it to get most of it off. And voila! Because your boyfriend/husband does not want to kiss you and have a lipstick taste in his mouth :p Dabbing the color keeps your lip color but not too much for kissing :)


Fix your hair and put on a cute outfit and DONE! :D You're ready! ;)
If you have any questions, comments, complaints, ideas etc email me! :D

Continue reading...

Saturday, January 29, 2011

Gem from Tron


I love this look so much. It is so much fun and perfect for a night at the club or a costume party. I love how dramatic and awesome the eyes are played up. As soon as I saw the movie I fell in love! My boyfriend was telling me how good the first one was and was like gushing over it. He got me hooked. :p When I saw Gem's makeup I just had to recreate it, it is just so much fun!


First as usual ladies; moisturizer, and primer. Gem is actually white in the movie but if you actually made yourself white it would look weird since you don't have camera effects on you :p However you do want to go a shade lighter of foundation or even two shades if you can. I used Loreal's True Match foundation in Porcelain. Then used Bare Essentials Mineral Veil powder and applied it all over my face. I did two applications of the powder. This powder is almost impossible to make look cake-y. It just gives your skin a nice finish. Gem doesn't have any flaws or blemishes on her face, nor black circles. So conceal your dark circles, the redness (if you have it) on the sides of your nose, on the sides of your lips, any blemish or imperfection you want to hide.

Next comes the fun part, the eyes. I don't have very many tips for you to get the perfect shape, but I can recommend that you have eye makeup remover handy with a couple of q-tips. That way if you make any mistakes you can instantly fix them. Apply a eyelid primer to your eyes to prep them and so that the eye makeup will last longer. I used MAC's Painterly Paint. First thing you want to do is create the shape of the eyeliner. Using a gel based eyeliner in this case I am using Stila's Smudge Pot in black cat. Use your eyeliner brush and draw an outline of the shape you want. Draw the line just a little past your crease. Look at a picture of Gem to help guide you. Then fill the outline you just created. Bring the line down underneath your water line, connecting the lines in the corners of your eyes. Repeat these steps on the next eye. Touch up any mistakes you made on the way if needed.

Now time for lashes, you will need two pairs of lashes. It is really up to you what kind of lashes you want to use, any will do. I used two different MAC lashes this one and this one. Measure the lashes to your eye and cut according to your eye shape. Lashes almost always have to be cut because nobodies eyes are that long. :p Apply a thin strip of glue along the lashes and place as close to the lash line as possible. Repeat again with the next pair of lashes. Your look should be coming together.


You don't want to use strip lashes for the bottom lashes since this will look weird and won't be the look you want. Individual lashes are a pain to put on, but trust me you will thank me after you are finished ;) I used about 6 or 7 individual lashes on each eye. You may want to apply more depending on how long and thick your bottom lashes are. Take tweezers to pick up the lashes and dip the tip in glue you only want a tiny amount of glue. Then apply on the lashes, but be careful not to glue them to your waterline. This is pretty time consuming so just be patient.


Now if you don't have naturally black eyelashes take some liquid eyeliner and apply a tiny bit on your own lashes to blend in the with the fake ones. It helps give a cleaner look.

We won't be applying any blush because Gem's face is all one color. But for eyebrows you can go for the real look and arch your eyebrows really high and hiding your own with concealer. But I just worked with the shape of my own eyebrows and filled them in with black eyeliner. You be the judge and decide what you want to do.


Gem has a really tiny nose so to make my nose look smaller I took a light brown eyeshadow and lightly brushed it on the sides of my nose.


Last step apply a pink glossy lipstick/gloss. Gem's lips are glossy in the movie but not dramatic because her eyes is what is meant to catch your eyes.


And finished! :) This look is really quite simple and only requires your time and effort :p I hope you enjoyed this as much as I did.


If you have any questions, comments, complaints or suggestions. Email me at

Continue reading...

Monday, January 17, 2011

Marney!


Meet Marney! :) My sister's good friend/roommate from high school. I did her hair and makeup and stuffed her in a dress to take picture for our store. Which is now officially open! :D I kept the eyes pretty neutral with a pop of purple color.

I won't show how to do this tutorial since I didn't take pictures throughout the process and was planning on doing wedding makeup. But to give you an idea of a good look for your wedding. :)


I think she looks absolutely gorgeous if I do say so myself :p
I kept the look light and natural adding false eyelashes for a bit of a dramatic look. Rosy cheeks and highlights on the apples of her cheeks to give her that "in love" glow :)

Her hair was just little curls with the You Curl curling iron and teased at the crown to give her a little bump for the tiara to sit on. :)


Sorry for no tutorial guys! I am hoping to get one up soon! If you have any questions or ideas email me! Even if you have comments or complaints I'm all ears ;)

Continue reading...

Monday, January 3, 2011

Becka!


Meet Becka! One of my good friends from high school. She is 19 and is absolutely gorgeous! ;) She came and visited me during Christmas break and I used her as my guinea pig :p She didn't seem to mind.

Becka is the first person to be featured on my blog. :) And she isn't the last ;) Sorry for the lack of updates! I have been busy with stuff for the store lately.

Becka wanted something with a bright red lip. So I went for a sort of a burlesques look. I think she pulls it off very well :) She was so excited to be the first official "client" if you will. :p

I know I sound like a broken record by always telling you the same things first; moisturizer, primer, foundation, powder, and concealer.

For this look you want to make your skin a little bit lighter then usual for the bright red lips to look its best ;)

For the eyes we will keep it super natural all browns and really you can do whatever combination you want to. I used two brown MAC pigments they create a subtle wash over your eyelid.

I used two different colors from two different sets from MAC.
I used this Reflects Bronze color on her eyelid but only to the crease then brought the color down on her lower lash line. With Pigments you have to be careful they are purely powder and you will have fall outs (eyeshadow falling on your cheeks) So my suggestion would be to not put on concealer until you are all finished applying your eyeshadow.
Then I used this Jigs & Jive color over the other color on her eyelid and went a little past the crease.
Then I took a dark reddish purple color and blended it into her crease. Which gave her eye some definition and depth.

Next take a either a felt tip eyeliner or a liquid eyeliner (I used both) and line your eyes winging the ends of it. When using liquid eyeliner don't open your eyes right away keep them closed for a few seconds so that you don't get the liquid eyeliner on your already applied makeup.

Now apply false eyelashes Becka is wearing MAC ones. Apply a thin strip of glue, then wait 30 seconds to dry then apply lashes. Make sure it is as close to the lash line as possible.

Finished eye:


Next step is bright red lipstick. You have to line your lips before you apply red lipstick and a little trick to help your lipstick last all day long apply foundation on your lips. I used a NYX lip liner and lined her lips giving them a more defined shape.

Then I applied red Benefit lipstick all over her lips.

And for the last two steps take a bronzer (you can just use brown eyeshadow) and applied it on her cheek bones. Then took a highligher and applied it over the apples of her cheeks and right on her cupids bow (skin right above your lips) and right underneath her bottom lip.


And FINISHED! :D Thanks Becka for letting me use your face :p If you have any questions, comments, complaints or ideas email me! :)


Continue reading...

Sunday, November 21, 2010

Natural Wedding Makeup


This look is great for every skin tone it will give you that radiant in-love-glow. It is very soft and obviously natural as it says in the title :p It even looks good with glasses! ;) But of course you don't have to be getting married to wear this look. Its perfect for school, work, dates, parties, you name it! Of course before your wedding do a trial test to see if you like the makeup. Not just for this one, but if you decide to have it done have a trial and make sure you like it. You don't want to break out from something the day of your wedding, or hate the way you look.


First things first skin care is the most important step to makeup. You need to wash your face two times a day, especially at night! I cannot stress how important it is to get off the makeup before you sleep! Three steps, cleanser, toner, moisturizer. Do not tug when cleansing your face this cause premature wrinkles! Always always always do these three steps.

Today we will do things a bit differently, start off with your usual moisturizer, and foundation, and powder. But do not put concealer on underneath your eyes. That will be last because we will be using loose powder for the eyes and you will get fall outs (eyeshadow will fall underneath your eyes) You are however allowed to apply it everywhere else like your nose, mouth and other red areas or blemishes.

For the foundation we want to use airbrush makeup, however most of us cannot afford an airbrush machine so we will use the drug store brand Sally Hanson Airbrush Makeup which works amazingly. Spray it all over your face and use a stippling brush or powder brush and apply evenly all over your face. This helps to create that airbrush look, it really does work and it is super cheap! Next for powder I am using Bare Escentuals Mineral Veil to finish off my airbrush look. This helps give a finish to the look and also set the makeup. Apply some powder into the cap and swirl your brush until it collects all the powder then apply evenly on your face.

Next apply concealer everywhere you need it except for underneath your eyes. Now apply a eyeshadow primer to your eyelids.

Take a shimmery white eyeshadow and apply it to your eyelid, the inner corner of your eyes and also right on the brown bone. This is just highlighting key areas. Now you want to take your eyeshadow which today we will be using Anastasia eyeshadow, this actually came in a kit with eyebrow gel and a bunch of other goodies. I searched Sephora and they don't have it out anymore. But no worries :) There are a billion other colors like them on the market ;) We will start with the darker color first (on the left)

Apply all over your lid to your crease with your finger. Your finger works best for loose powder because not a lot of color will stay on the brush to apply. So it will take twice as long with a brush than with your hands. Then take the lighter color (on the right) and apply from your crease to your brow bone with your ring finger. I found its better and easier to use your ring finger. This helps create definition, and don't worry about covering the white up. Next you will take the shimmery white and apply it right on your brown bone again blending into the brown. As you can see the color is very light, and that is on purpose.
You want to make it look like you are not wearing any makeup at all. Now take a flat brush and dip it in the darker color and apply right under your lashline. It will be light but that is what we want, you can make it darker if you would like.

Eyeliner is next, first you will tightline (line the upper waterline near your lashes) Take a black pencil, I am using a MAC pencil. Line your eye and try not to blink right after you have finished, this will trace the black to your lower waterline. Tightlining makes your eyelashes appear fuller and gives your eyes a shape. Next we will be using purple eyeliner. I am using Smashbox's purple pencil eyeliner. Any purple will do. Line your eyes as close to the lashes as possible, don't worry about if the line is straight or not. That is easily fixed, take your finger or an eyeliner smudge brush and smudge the liner and then apply more eyeshadow on top to give it a softer feel. Then line your waterline and right above your lashes. If you got any black on your lower waterline that is fine you can wipe away with a finger then apply the purple over it.

Next curl your lashes, apply mascara. Then fill in your eyebrows and after you fill them in apply a brow gel to make them stay in place. I don't know about you but I have trouble with them staying put they sometimes point out or go the opposite way I want them too. If you don't have eyebrow gel, Pomade works just as well. Just take your finger and apply a tiny amount of gel over them. Don't put too much you don't want to make them look glossy :p Then take an eyebrow brush and point those stubborn hairs to go the way you want them.

Now take a tissue and clean underneath your eyes. Then apply your concealer, yes I know you have color underneath your eye, but you can always reapply that if needed. Then apply mascara to your lower lashes.

For cheeks you want that blushing bride look so take Smashbox's O-glow blush and apply it from the apple of your cheeks to your cheek bones, blend well. This particular blush comes out white and will turn to pink as soon as it hits your skin. It blends really well and give just the right amount of color. Then take your highlighter and apply right on the top of your cheeks. For highlighter I am using my favorite High beam by Benefit.

For lips apply your highlighter at the cupids bow (top of your lips) and right underneath your lower lip. Then take a dark red lipstick apply on your lips with a lip brush. Applying with a lip brush helps give your lips a more defined shape. It also helps you to keep within the lines of your lips and leaves room for fewer mistakes.

Finished! Now add a white dress and a veil and you're ready to walk down the isle! ;)

If you have any questions, suggestions, or comments email me! :)
Continue reading...
 

Eres Muy Bella Copyright © 2009 Cosmetic Girl Designed by Ipietoon | In Collaboration with FIFA
Girl Illustration Copyrighted to Dapino Colada